Charms & notches
The signature loadout system. ~45 charms, each with a notch cost from 1 to 5. The Knight has a notch budget that grows from 3 to 11 over the game. Pick which charms fit. Most builds carry 4–6.
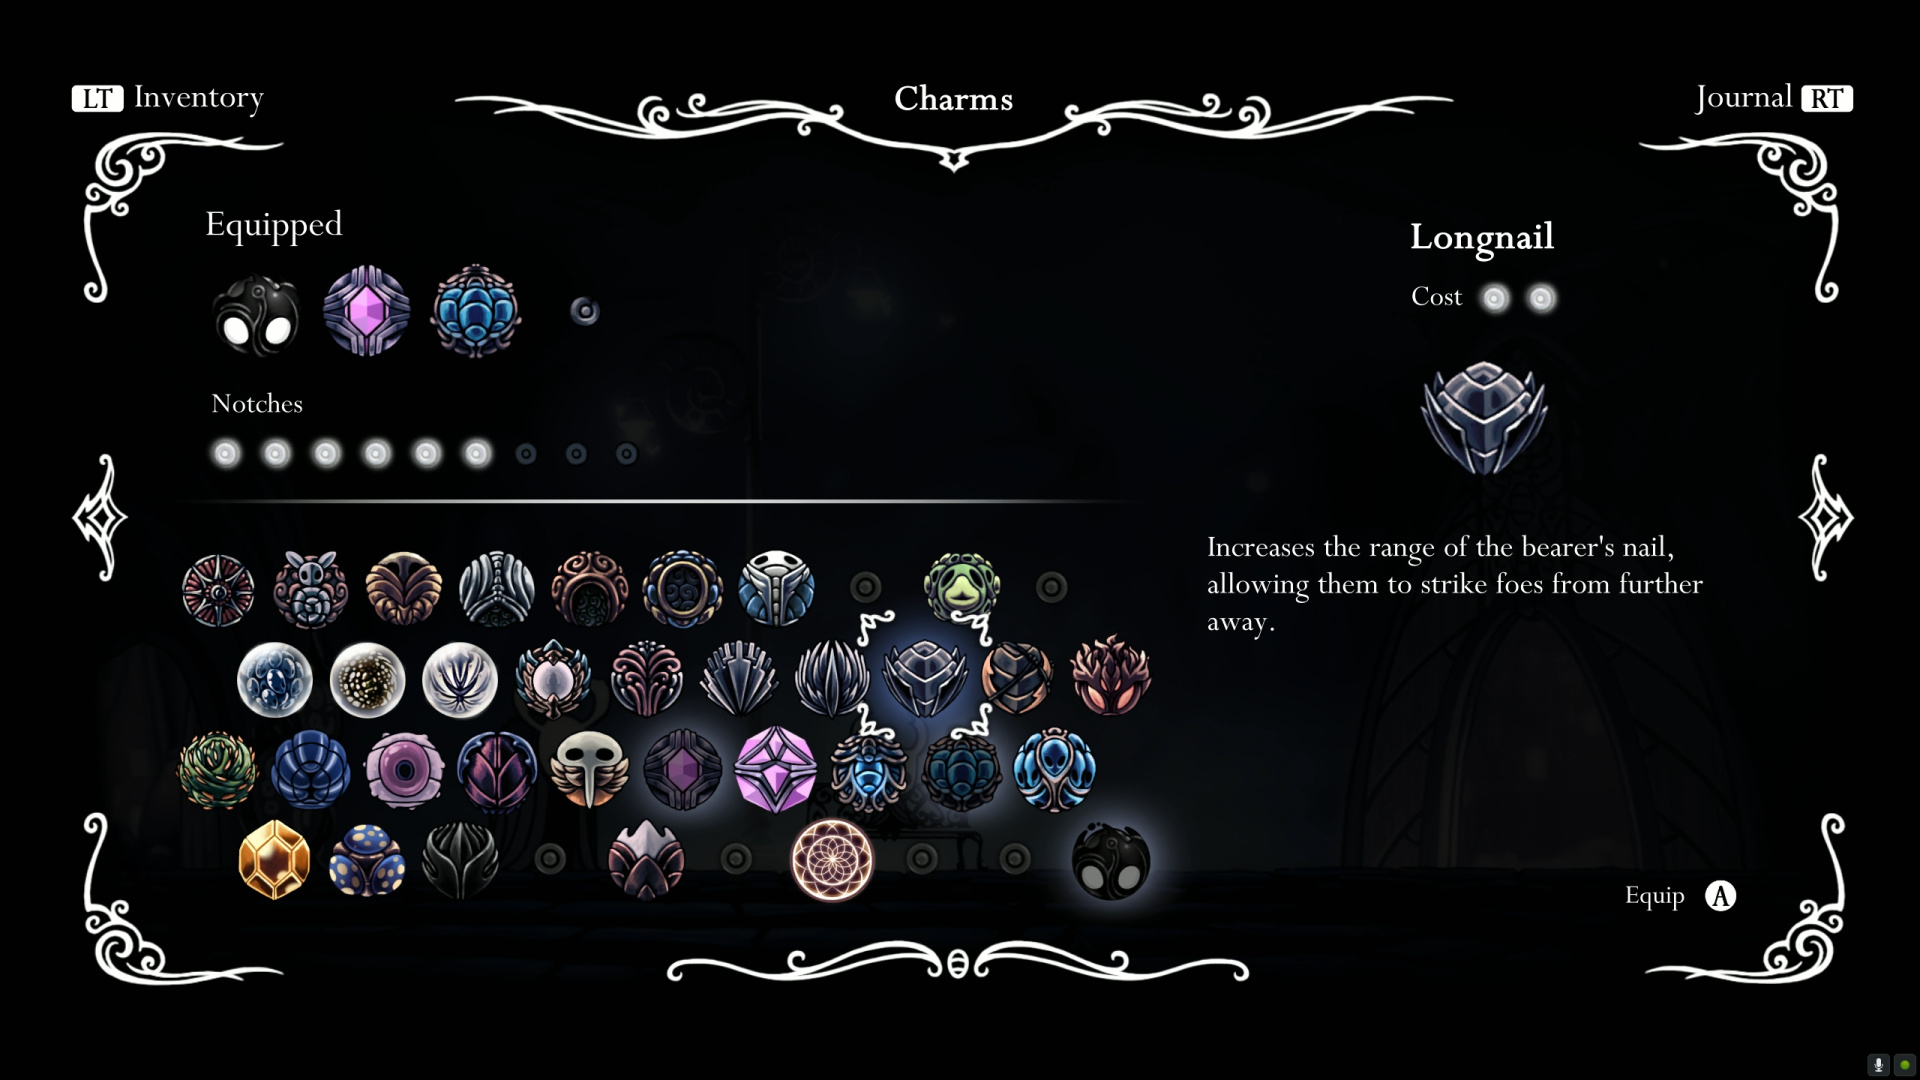 The Charms screen: the canonical Hollow Knight loadout shot. Top-left: 3 equipped charms (visible icons). Below: the notch row with 5 of 11 notches in use. Bottom: the full charm grid (~45 of them). Right: the selected charm's tooltip, Longnail costs 2 notches, "Increases the range of the bearer's nail, allowing them to strike foes from further away." Source: Game UI Database.
The notch budget
| Notches | When | How |
|---|---|---|
| 3 | Game start | Default |
| +1 | Salubra (4 charms collected → +1 notch) | Buy from Salubra |
| +1 | Salubra (10, 18, 25, 40 charms → +1 notch each) | Same vendor |
| +1 | Hidden notches (Grimm Troupe quests, Salubra blessing, etc.) | Various |
| 11 max | Late game | All sources combined |
The budget grows over the game, but slowly enough that you're always making real cuts. A 5-notch Quick Slash eats almost half your early budget; equipping it forecloses 4–5 small charms.
Charm cost as the budget axis
Each charm has a notch cost:
- 1-notch: Cheap utility charms (Wayward Compass, Steady Body, Mark of Pride). Slot multiple.
- 2–3 notch: Most major charms. The bulk of build choices live here.
- 4–5 notch: Build-defining or expensive offense (Shaman Stone, Quick Slash, Joni's Blessing, Soul Eater).
So a typical build at 11 notches is one expensive charm + 3–4 cheap ones OR two mid-cost charms + 2 cheap. Different ratios produce visibly different playstyles.
This is loadout-as-budget in its purest numeric form, no spatial tetris (Sparklite), no draw-from-deck combinatorial (Spire), no polarity-matching (Warframe). Just N notches, items have integer costs, fit what you can.
Bonus-with-drawback charms: the build-defining commits
Several charms have explicit drawbacks; these are the ones that define identity-builds:
| Charm | Bonus | Drawback |
|---|---|---|
| Joni's Blessing | Replaces blue Lifeblood masks with white permanent ones; +40% max HP | Cannot heal with Soul (no Focus possible) |
| Defender's Crest | Spawns smell cloud that damages enemies in radius | NPCs comment that you smell terrible; some characters react to it |
| Glowing Womb | Spawns Hatchlings to fight for you, costs Soul over time | Soul drain means less Focus available |
| Grubsong | Gain Soul when you take damage | Only useful if you take damage: it's an explicit "tank" commitment |
| Heavy Blow | Knockback enemies further with nail | Pushes them out of follow-up attack range |
| Fragile Heart / Strength / Greed | +HP, +damage, +Geo earned | Shatter on death: you must pay 200/350/450 Geo to repair them |
Joni's Blessing is the canonical case: trade your healing system entirely for a 40% HP boost. Builds with Joni's are pure-aggression, you can't recover, so you must not get hit. Anti-Joni's builds use Soul Eater + Quick Focus to heal often. Different playstyles, not different power levels.
This is structural bonus-with-drawback, the trade is the design.
Overcharming: the opt-in extension
If you have more charms equipped than you have notches for (overcharming), you can confirm overcharm by holding the equip button. Overcharmed:
- All your charms work normally.
- You take double damage until you remove charms.
So overcharming is another bonus-with-drawback layer: cram the build you want now, accept the damage penalty. Most challenging-content runners overcharm aggressively because boss fights with 1 extra charm > boss fights without it, even at 2× damage taken.
The game doesn't require this. It's available as a player skill flex.
Inventory context
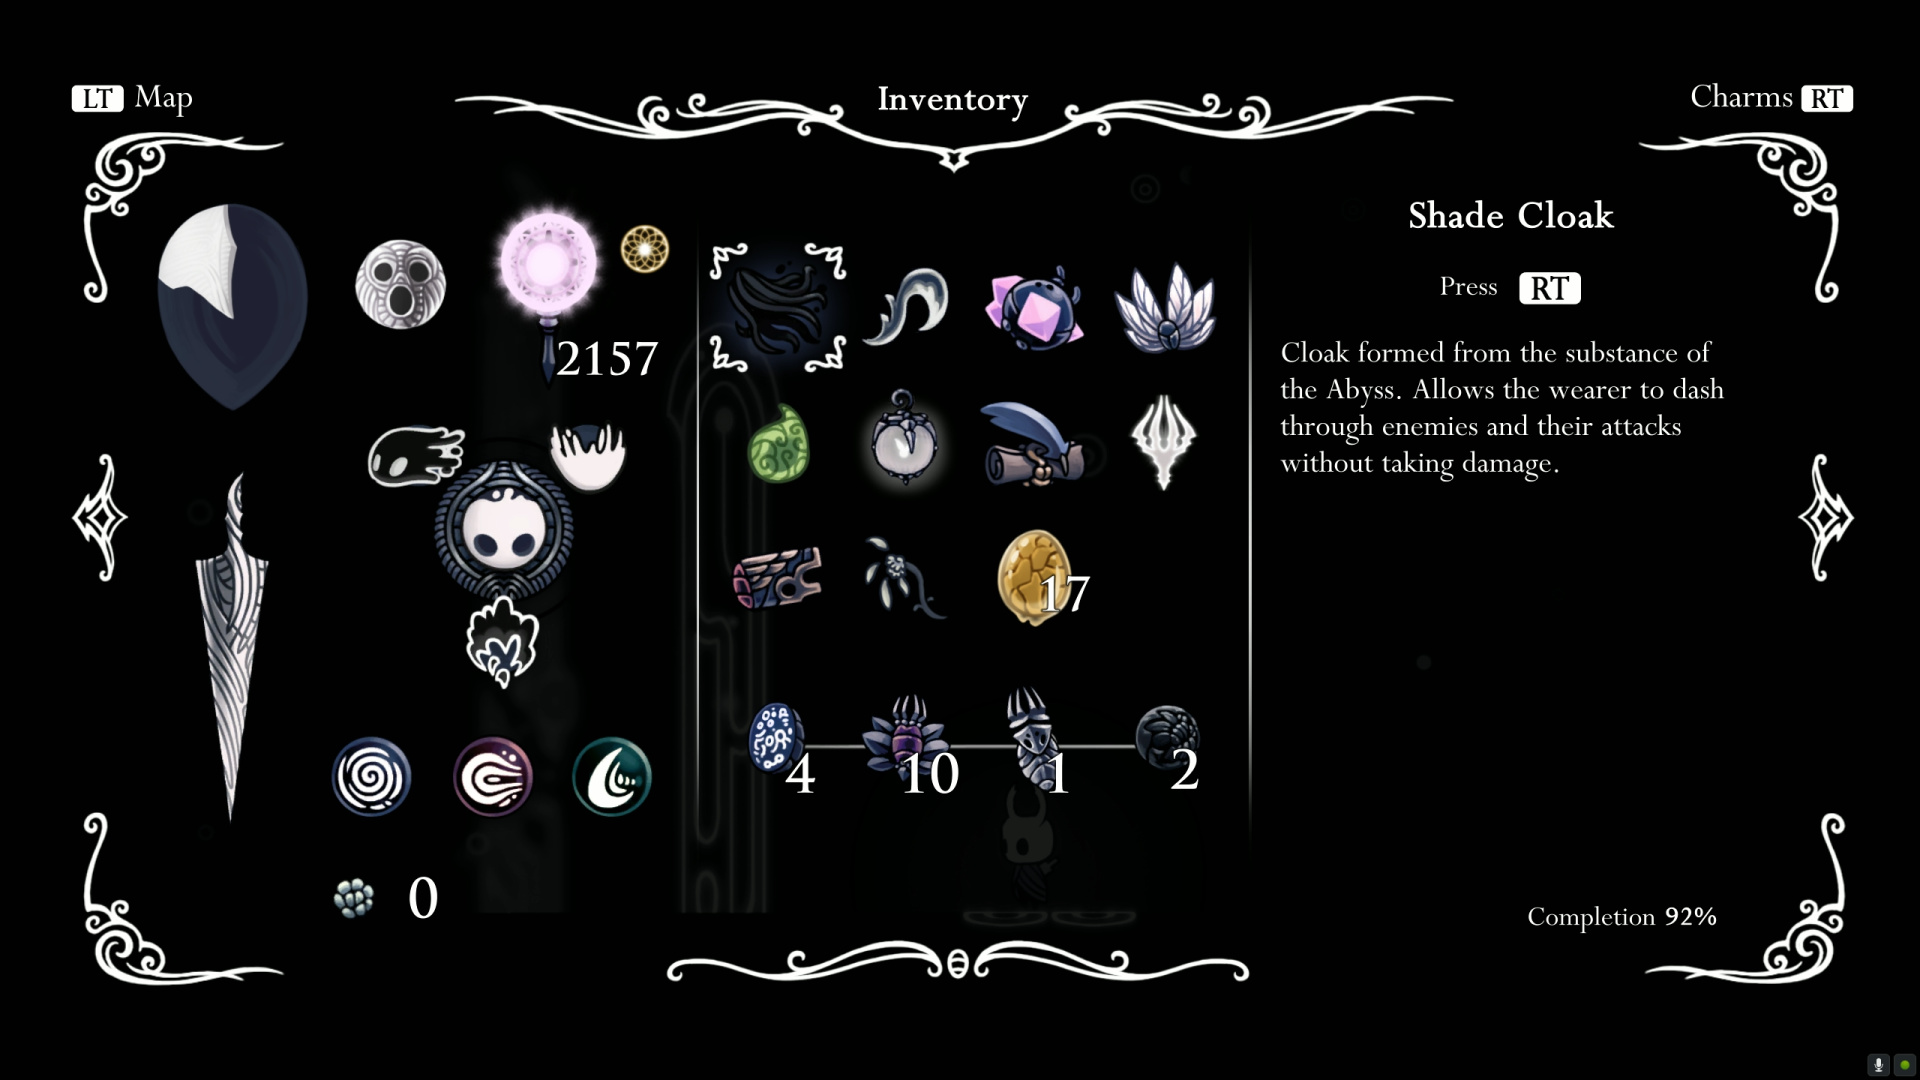 The inventory shows the Knight's other progression axes: Geo currency (2157), Pale Ore (17, used to upgrade the Nail), the spells row (Vengeful Spirit, etc.), Mask Shards (4 = +1 max HP at the Mask Maker), Vessel Fragments (3 = +1 Soul vessel). Each is a separate progression axis layered on top of the Charm system. Source: Game UI Database.
This is also nested-progression-graph territory, Charms aren't the only build axis, just the most visible. Mask Shards (HP), Vessel Fragments (Soul capacity), Pale Ore (Nail damage upgrades), and Spells (3 main + their stronger variants) all stack independently.
What this teaches
- A simple integer-budget loadout can carry an entire metroidvania's build identity. No need for grid-tetris or polarity-matching; just costs that don't fit.
- Charm-style drawbacks define playstyles, not power tiers. Joni's Blessing isn't better than Soul Eater; they're different. Build identity > stat-stacking.
- Overcharming as opt-in friction is elegant. It lets the player break the budget at a known cost, instead of telling them no.
- Layer multiple budgets with different scopes. Charms (resettable per session), Mask Shards (permanent HP), Pale Ore (permanent Nail): each has different commitment timescales. Nested.
Patterns this exemplifies
loadout-as-budget: pure numeric notch budget, the minimalist version of the pattern.bonus-with-drawback: Joni's Blessing, Defender's Crest, Fragile family, overcharming. Several at once.opportunity-cost-loadout: every charm slotted is a charm not slotted. Builds commit; you don't carry one of everything.