Dungeon map: DAG node types
Between mini-dungeons of a Crusade, the run pauses on a map screen. You see the next 1–3 layers of nodes and pick a path. The structure is a small branching DAG, same family as Slay the Spire's act map and Hades' chamber selector, but shorter and more frequent. You re-encounter the map every few rooms, not once per act.
This page is the field-guide to every node icon, what it asks of you, and what it pays.
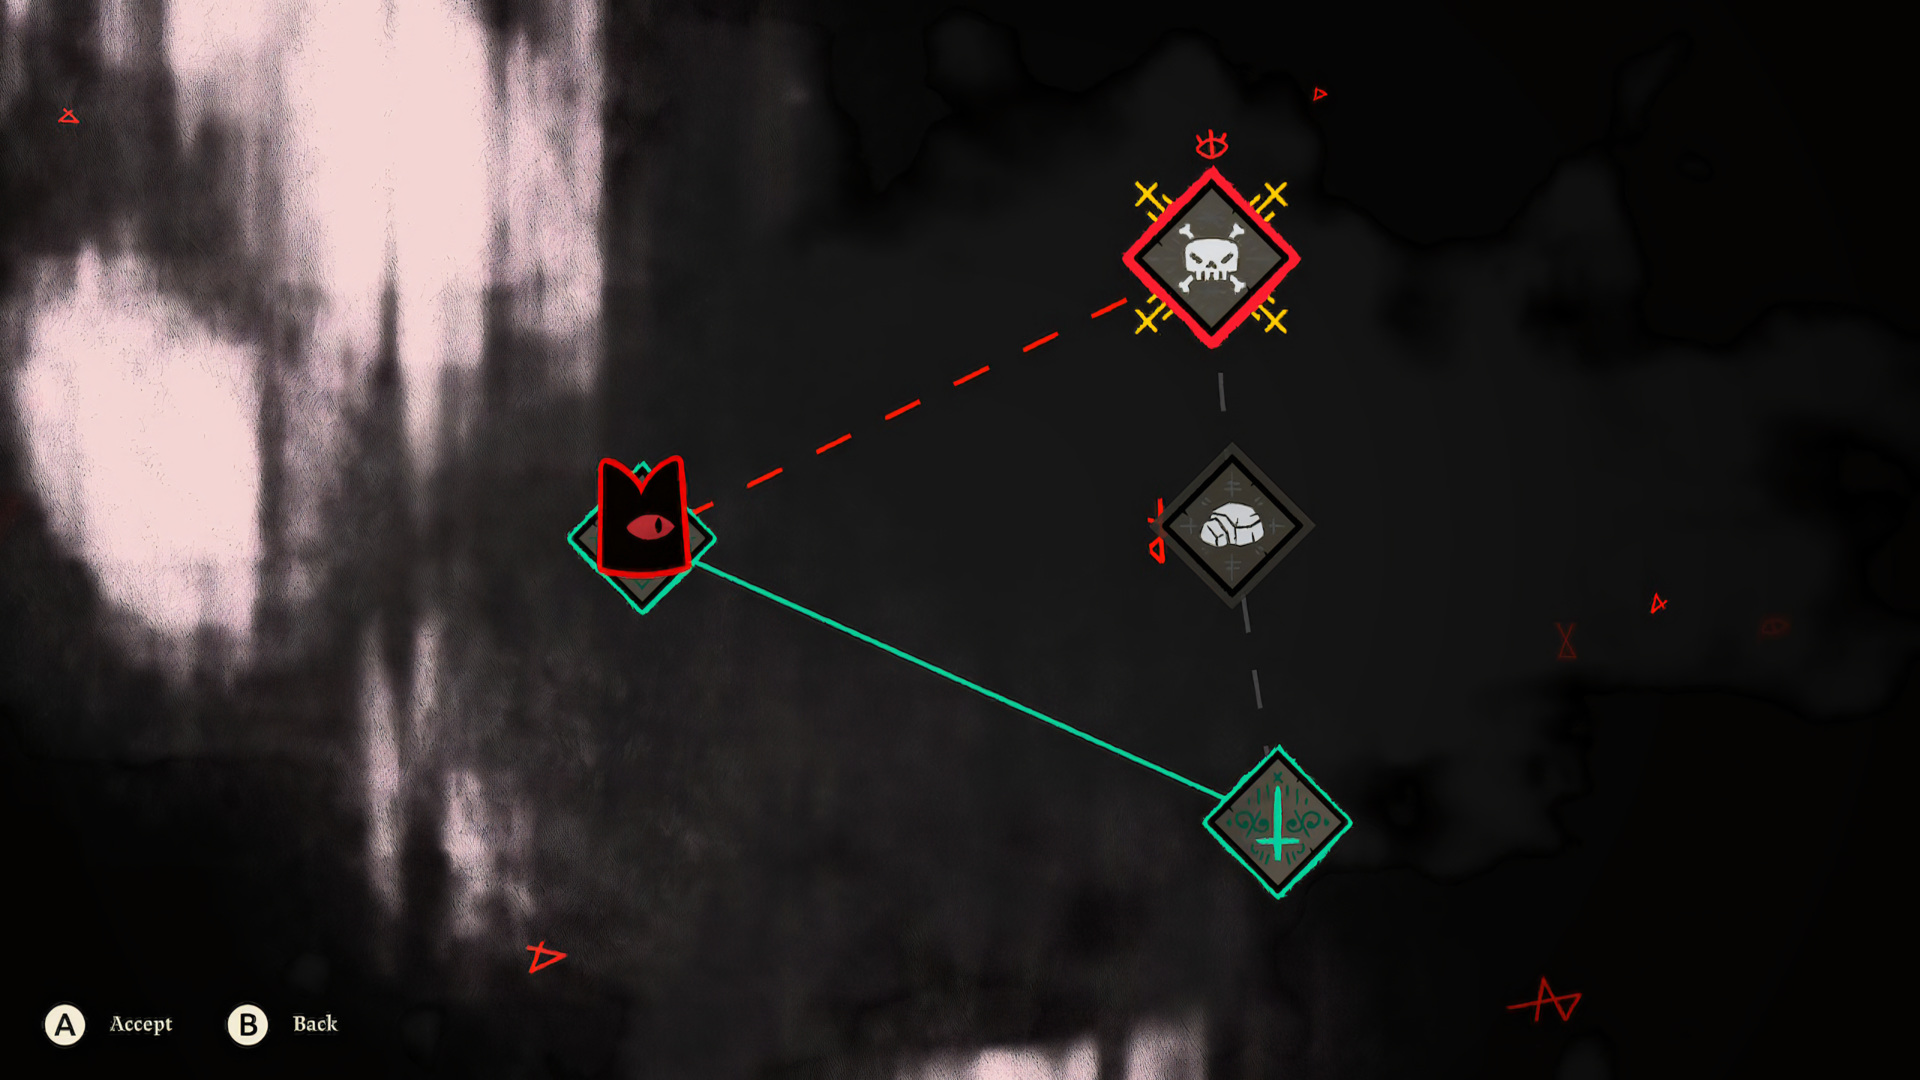 A mid-Crusade map. The Lamb is in the red-bordered current node. Solid teal = path picked / committed. Dashed red = previewed but not chosen. Solid grey = available branch. Three node types are visible: a skull (boss/mini-boss), an unlabelled cell (standard combat / encounter), and a small cross-icon node (Prayer / Altar). Source: Game UI Database.
Node types
The icons are reliable across all four Lands. The biome only swaps what's inside each node, not its semantic.
Combat (standard fight)
- Icon: plain framed cell, often with an inverted-cross faint marking.
- Cost: time + HP risk.
- Pays: Bones, small resource drops, sometimes a Heart on clear.
- Notes: the workhorse node. Most map paths are mostly combat.
Mini-boss / Witness
- Icon: skull and crossbones, gold or red bordered.
- Cost: a serious fight; expect to use a heal.
- Pays: a recruitable follower (the iconic mini-boss reward), Doctrine Stone fragments, often a Tarot pick.
- Notes: mini-bosses are the gating event of every non-Bishop Crusade. The "follower-from-fight" loop is one of the game's most-loved mechanics: you've just beaten this creature and now they kneel before you.
Bishop
- Icon: cultist hat with single green eye.
- Cost: the run climax, ~3–5 phases of bullet-hell.
- Pays: the act payoffs: Crown power, Holy Talisman fragment, full Bishop's faction released to your cult, story cutscene.
- Notes: see Bishops & progression for the triple-payoff structure.
Tarot
- Icon: Clauneck's striped tent (the fortune-teller).
- Cost: free pick + optional Gold to buy more.
- Pays: a Tarot Card slotted into your in-run hand (resets at Crusade end).
- Notes: "Tarot" rooms are the run-shaping node. You get to commit to a build direction: Fervour generation, raw damage, follower-synergy, lifesteal, depending on what you draw.
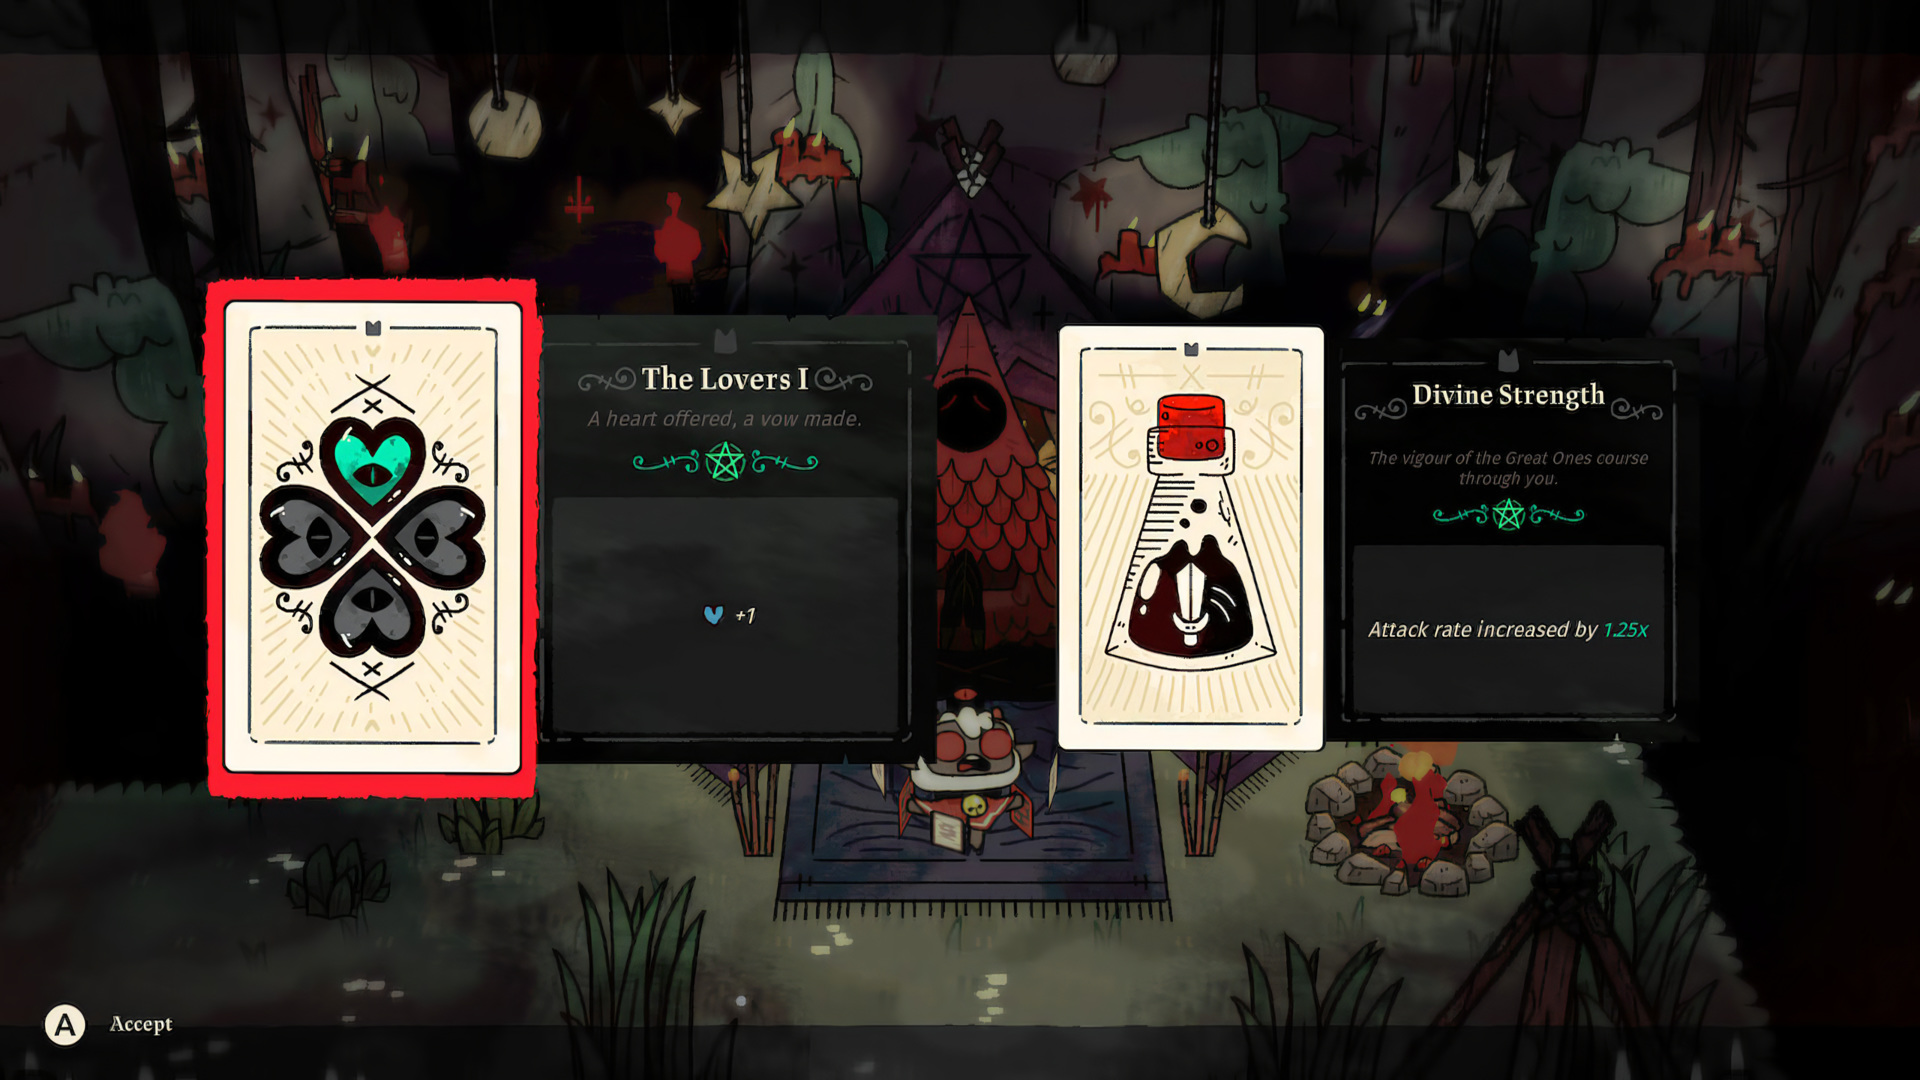 Tarot pickup. Two of the three cards are face-up; you pick one. Lovers I (+1 Heart) is pure survivability; Divine Strength (1.25× attack rate) is offence. These are categorically different runs by the next combat room: see
 bonus-with-drawback. Source: Game UI Database.
Lore room
- Icon: scroll / open book.
- Cost: none.
- Pays: 1–3 Tarot Cards from a draft, or a small narrative beat plus Clauneck's secondary shop. Often the first "free" room of a mini-dungeon.
Recruitment
- Icon: kneeling silhouette with raised hands.
- Cost: sometimes a small fight; sometimes free.
- Pays: a follower NPC rescued from a cage / cocoon / pit. They walk back to the cult on run-return.
- Notes: in-dungeon recruitment is additive to mini-boss recruitment: both feed the cult's labour pool.
Resource node
- Icon: the resource itself (coin, log, stone, bone, food pile).
- Cost: none, or a tiny ambush.
- Pays: an immediate pile of that resource.
- Notes: these are pure "hub bottleneck offset" rooms. If you're three logs short of the new Bath House, you take the lumber node.
Heart room (Ratoo)
- Icon: heart, sometimes with a small NPC silhouette.
- Cost: none, or a Coin price.
- Pays: full heal and/or a max-HP trade: Ratoo lets you sell a heart container for a Hathor-relic-tier boon or vice versa.
- Notes: one of the only mid-run permanent changes (the max-HP swap persists).
Shop
- Icon: vendor silhouette / coin scale.
- Cost: Gold.
- Pays: Tarot Cards, follower recruits, resources, sometimes a weapon/curse swap.
- Notes: Gold burns hot: it doesn't carry between runs by default, so unspent Gold evaporates at Crusade end. Buying out the shop is almost always correct.
Event (question mark)
- Icon: question mark.
- Cost: unpredictable: usually a small choice with a written-out cost/benefit.
- Pays: loyalty boons, debuffs, conversions, fixed-fee deals. Same shape as Spire's
?events.
Prayer / Altar (The One Who Waits)
- Icon: red oval eye / cross-inscribed cell.
- Cost: none.
- Pays: a Crown power-up: usually a small Fervour boost or a one-shot ability.
Graveyard
- Icon: small headstone.
- Cost: an undead ambush.
- Pays: Bones (a lot of them), occasionally a special Skeleton-themed follower or weapon.
Sacrifice door
- Icon: a sealed gate with a follower silhouette and a number: "Open Door: N Followers".
- Cost: literally a follower from your hub roster. Permanent. No resurrection.
- Pays: opens an entire alternate biome / detour for the rest of the run, plus a stacked "Blood of the Covenant" objective list (return with more Gold, more Followers, etc.) whose completion compounds rewards on success.
- Notes: the most expensive choice in the game. A sacrifice door is the only place where the dungeon directly extracts state from the hub, not just for the hub.
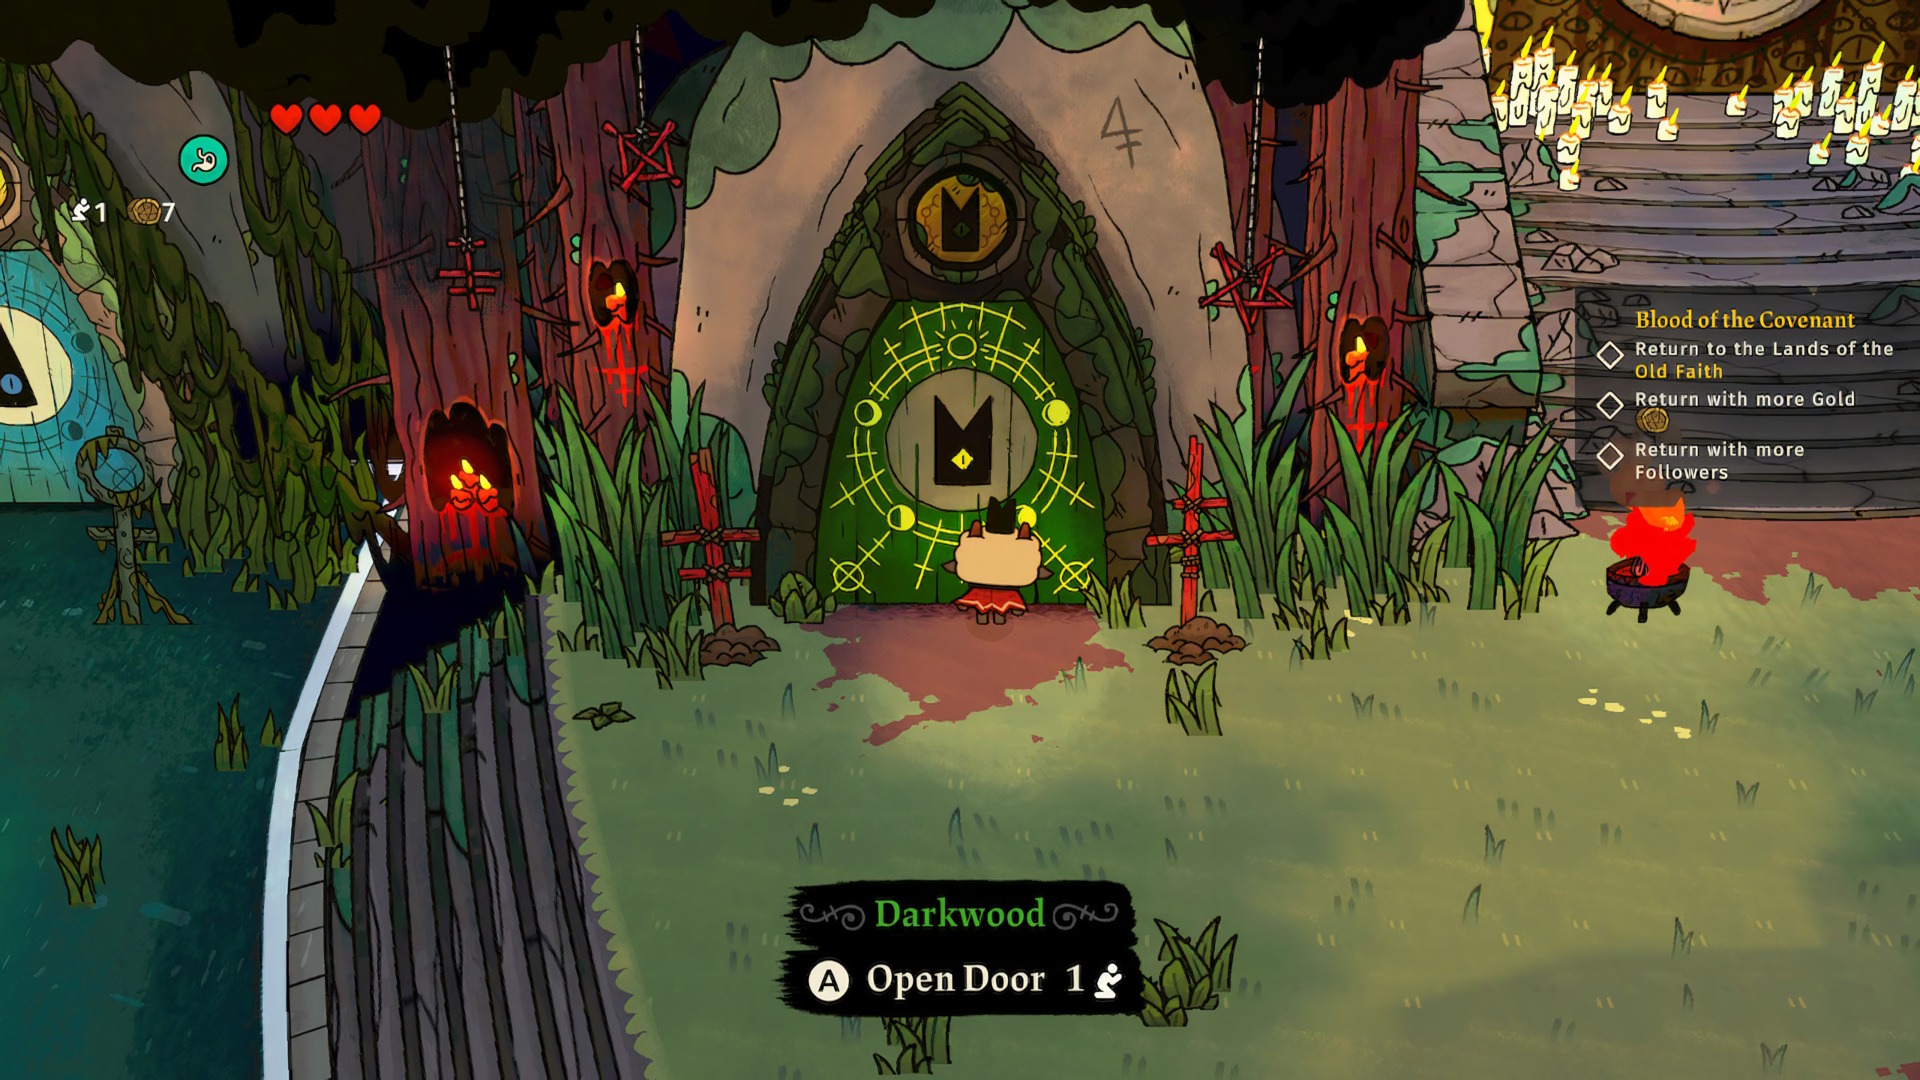 The sacrifice door. The cost is literally one of the cultists you indoctrinated and named back at the hub. The reward is access to a deeper detour with bundled "Blood of the Covenant" return conditions: itself a wager that you'll survive long enough to claim the bonus. This is the strongest single instance of
 bonus-with-drawback in the game because the drawback isn't an in-run stat: it's a named character with a level and a face. Source: Game UI Database.
How node selection actually plays
The DAG is short, typically 2–4 forks before the next mini-boss or Bishop, which makes it qualitatively different from Spire's 15-floor map. You're not planning a route; you're making a now-decision with one or two layers of preview.
This is closer to Hades' chamber-door previews than to Spire's full-map view, but with a wider menu of node types. Two consequences:
- Reads are tactical, not strategic. You're rarely planning around a node six steps ahead: you're picking between "Bones now vs. Tarot now."
- The sacrifice door has no replan path. Once you pay the cost, you commit to the detour for the rest of the Crusade. This pushes the door into a high-tension single-decision slot.
Compared to other DAG maps
| Game | DAG length | Preview depth | Node menu | Choice cost |
|---|---|---|---|---|
| Slay the Spire | 15 floors (full act) | Whole-map | ~10 node types | Time + HP risk |
| Hades | 1 chamber at a time | Door icons (next room) | ~4 reward types | None: door is free |
| Moonlighter 2 | 1 dungeon (per descent) | Whole-map | ~10 node types | Time + HP risk |
| Cult of the Lamb | 2–4 forks per mini-dungeon | 1–3 layers | ~12 node types | Time + HP + (rare) follower |
CotL's distinguishing feature is the follower-cost door, a node type that takes from the other loop. Nothing on this row exists in Spire or Hades; Moonlighter 2's closest analogue is the perk-node opportunity cost, but it doesn't reach across to the hub.
See branching-dag-map for the cross-game contrast page.
Patterns this exemplifies
branching-dag-map: the structural pattern.bonus-with-drawback: sacrifice doors and Tarot picks are the textbook cases.